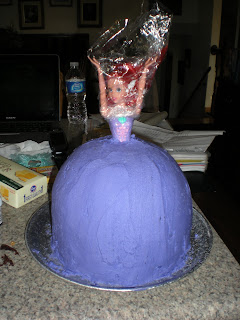
Yesterday was my client's birthday. She LOVES barbies and LOVES the Little Mermaid. Months ago, I promised her that I would make an Ariel Barbie Cake for her birthday. When I walked into the door with it, she was thrilled. Isn't food such a wonderful thing when you have the opportunity to make it for other people?
Barbie Cake
2 boxes cake mix, any flavor you desire
Frosting:
1/2 cup butter
1/2 cup shortening
1 teaspoon vanilla
4 cups powdered sugar
1-2 tablespoons milk
Directions:
Preheat the oven to 350 degrees F. Grease a large ovenproof glass mixing bowl with shortening and dust with flour. Also grease and flour two round cake pans. Prepare the cakes as directed on the boxes. Pour one cake mix batter into the prepared bowl and the other cake mix batter into the two prepared round pans. Bake the bowl cake for 50-60 minutes (or until a cake tester inserted into the center comes out clean). Bake the round cakes as directed on the box. Cool for 10 minutes. Remove cakes from bowl and pans, and allow to sit on a wire rack until completely cooled. Gently trim the cake tops with a serrated knife if they are uneven, so stacking will be easier.
Frosting: Whip together the butter and shortening until light and fluffy. Blend in the vanilla. Gradually add in the powdered sugar. Add in milk until you reach a desired consistency.
Okay, here's the first step: On your serving plate, stack the two round cakes on top of one another, using the frosting as a glue. Make sure they are even. Now flip over the bowl-shaped cake so that the narrow end is on the top, and place this on the stacked round cakes; again, using the frosting as glue for the stacking. Insert the barbie into the center of the cake. In order to form a well-shaped skirt for the barbie doll, glue on random pieces of cake with frosting around the doll's waist. Cover the doll's upper body with plastic wrap, so frosting does not ruin her hair. See picture below.
Alright, step two: Put the barbie cake into the freezer for about an hour, more or less. This part is important because it prevents the cake from getting crumbs into the frosting. Next, make more frosting (I made a double batch at this point). Make your frosting any color you desire. (I did three bowls, one purple, one aquamarine, and one plain white.) Remove the cake from the freezer. Cover the cake with your base frosting, using a butter knife or a spatula. (I chose to do purple.) In order to make the frosting smooth, curve a piece of paper (hamburger style) into a semi-circle; gently glide the paper from the bottom of the skirt to the waist, smoothing the frosting as you go. See picture below.
Last step: This is the fun part! Decorate the cake however you like. I decided to make a break-front skirt, using the aquamarine color for the top layer. I used an icing tube with a flower tip to ornament the trim of the skirt. I also lined the skirt with white to give it a more prominent edge. For the finishing touch, I covered the top layer with edible pearls. See picture below.
Voila! The finished product. Thank you Leah, Ira, and Mom for helping me out :) I know I have a bazillion pictures on here, but one more I must show you...
Here is my client. As you can see, she was very excited :) Isn't she adorable?


No comments:
Post a Comment