Pages

Saturday, October 30, 2010

Butternut Squash and Carrot Soup

A butternut squash soup with carrots, celery, and fresh chopped sage. This soup is both vegetarian and vegan. It is one of my favorite recipes.
 

Butternut Squash and Carrot Soup

  • 2 tbsp olive oil
  • 1 onion, diced
  • 4 cloves garlic, minced
  • 4 carrots, sliced
  • 3 stalks celery, diced
  • 2 small or one large butternut squash, peeled and chopped
  • 5 cups vegetable broth
  • 2 tbsp chopped fresh sage
  • 1/2 cup soy or almond milk, or milk of choice
  • salt and pepper to taste
  • curry powder to taste (optional, but the curry makes it divine)
Directions:
In a large soup pot, saute the onion and garlic in olive oil until onions turn soft, about 3 to 5 minutes.
Add the carrots and celery and cook for another 3 to 5 minutes.
Add the squash and stir just to coat, then add the vegetable broth and sage. Bring to a boil, then reduce heat to a slow simmer. Allow to cook for at least 25 minutes, or until squash is soft.
Using a potato masher or a large fork, mash the squash until smooth, or, you can puree the soup in a food processor or blender.
Stir in the soy milk and season with salt and pepper to taste.

Saturday, October 23, 2010

Som Tum (Green Papaya Salad)

Som Tum, or Green Papaya Salad, is a very common dish eaten throughout Thailand. It originated from Laos, but is now enjoyed by many in the United States. This spicy Thai salad is made from shredded unripened papaya. It is sour, hot, salty, and sweet...and absolutely delicious!


Som Tum (Som Tam)

1 teaspoon whole garlic cloves, minced
2-10 small Thai chilies (to taste), minced
1 tablespoon sugar
1 tablespoon fish sauce
1 long bean, broken into pieces
1 tomato
2 teaspoons lime juice
1 cup shredded green papaya
3 tablespoons dry roasted peanuts
1 cup chopped green cabbage

Directions:
  1. First prepare the papaya by peeling the dark green skin. Then, hold the papaya in your hand, and smack the fruit lengthwise with a good sized knife. You want to create 1/2″ or so deep cuts into the fruit. Do this over and over until you’ve created a good amount of cuts. Watch your fingers! Then, cut the papaya lengthwise to produce long strips. You can also buy tools which can create long shreds. But I recommend using a cheese grater (the big holes), it is much easier. Thai people use the knife method though.
  2. In a bowl, add the whole garlic cloves and chilies. Pound with a spoon a few times to mash, then add the long beans. (If you want to be really authentic, mix ingredients together with a ceramic mortar & pestle.)
  3. Pound a few more times, and add a pinch of papaya. This helps mix the garlic & chilies. Pound some more.
  4. Add the sugar, fish sauce and pound more. Make sure everything is well mixed.
  5. Add the tomato, chopped into large pieces. Stir with a spoon. Add the lime juice and the rest of the papaya. You want to evenly coat the papaya with the juices while pounding the flavor into the papaya, but don’t pound so hard that the papaya disintegrates. Add the peanuts, mix and serve over a bed of chopped cabbage.
  6. Note: Don't pound the papaya too hard. You want to gently bruise the fruit, not smash it into bits or make it soggy. The papaya should be crunchy.

Saturday, October 16, 2010

Barbie Cake

Yesterday was my client's birthday. She LOVES barbies and LOVES the Little Mermaid. Months ago, I promised her that I would make an Ariel Barbie Cake for her birthday. When I walked into the door with it, she was thrilled. Isn't food such a wonderful thing when you have the opportunity to make it for other people?

Barbie Cake

2 boxes cake mix, any flavor you desire
Frosting:
1/2 cup butter
1/2 cup shortening
1 teaspoon vanilla
4 cups powdered sugar
1-2 tablespoons milk

Directions:
Preheat the oven to 350 degrees F. Grease a large ovenproof glass mixing bowl with shortening and dust with flour. Also grease and flour two round cake pans. Prepare the cakes as directed on the boxes. Pour one cake mix batter into the prepared bowl and the other cake mix batter into the two prepared round pans. Bake the bowl cake for 50-60 minutes (or until a cake tester inserted into the center comes out clean). Bake the round cakes as directed on the box. Cool for 10 minutes. Remove cakes from bowl and pans, and allow to sit on a wire rack until completely cooled. Gently trim the cake tops with a serrated knife if they are uneven, so stacking will be easier.
Frosting: Whip together the butter and shortening until light and fluffy. Blend in the vanilla. Gradually add in the powdered sugar. Add in milk until you reach a desired consistency.

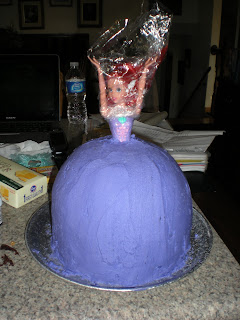
Okay, here's the first step: On your serving plate, stack the two round cakes on top of one another, using the frosting as a glue. Make sure they are even. Now flip over the bowl-shaped cake so that the narrow end is on the top, and place this on the stacked round cakes; again, using the frosting as glue for the stacking. Insert the barbie into the center of the cake. In order to form a well-shaped skirt for the barbie doll, glue on random pieces of cake with frosting around the doll's waist. Cover the doll's upper body with plastic wrap, so frosting does not ruin her hair. See picture below.
Alright, step two: Put the barbie cake into the freezer for about an hour, more or less. This part is important because it prevents the cake from getting crumbs into the frosting. Next, make more frosting (I made a double batch at this point). Make your frosting any color you desire. (I did three bowls, one purple, one aquamarine, and one plain white.) Remove the cake from the freezer. Cover the cake with your base frosting, using a butter knife or a spatula. (I chose to do purple.) In order to make the frosting smooth, curve a piece of paper (hamburger style) into a semi-circle; gently glide the paper from the bottom of the skirt to the waist, smoothing the frosting as you go. See picture below.
Last step: This is the fun part! Decorate the cake however you like. I decided to make a break-front skirt, using the aquamarine color for the top layer. I used an icing tube with a flower tip to ornament the trim of the skirt. I also lined the skirt with white to give it a more prominent edge. For the finishing touch, I covered the top layer with edible pearls. See picture below.
Voila! The finished product. Thank you Leah, Ira, and Mom for helping me out :) I know I have a bazillion pictures on here, but one more I must show you...
Here is my client. As you can see, she was very excited :) Isn't she adorable?

Saturday, October 9, 2010

Roasted Tomato Soup

The other day, my friend and I went "midnight tomato-picking" in his grandpa's garden. I got a huge sack of delicious tender tomatoes. I wasn't quite sure what to do with these, so I made Roasted Tomato Soup...and it was divine. Try this, you'll love it!

Roasted Tomato Soup
12 large (about 4 pounds) tomatoes, stemmed and quartered
1/4 cup olive oil
1/4 cup balsamic vinegar
6-8 garlic cloves, peeled
salt
pepper
1 cup chopped onions
2 cups chopped fresh basil, or 1-2 tablespoon dried basil
2 cups cold water, or veggie broth
+ additional balsamic vinegar, salt/pepper, a bay leaf, and a touch of cinnamon
Directions:
Preheat the oven to 500 degrees F. Place the tomatoes and garlic cloves on a baking sheet. Drizzle the olive oil and balsamic vinegar on top. Sprinkle on the salt and pepper, to taste. Mix with hands, and spread out mixture evenly. Roast the tomatoes in the oven until dark spots appear, about 35-40 minutes. Remove from oven and allow to cool for a few minutes. In a large saucepan over medium heat, saute the onions in a bit of olive oil. Cook until soft, about 8-10 minutes. Add the basil leaves and saute with the onions for about 1 minute. Add the roasted tomato mixture to the saucepan. Bring the mixture to a simmer and cook for 10 minutes. Season with salt and pepper, to taste, and throw in a bay leaf & some cinnamon. (I highly recommend adding in more balsamic vinegar for additional flavor.) Puree the tomato mixture in a blender, until very smooth. If serving right away, pour the soup back into the saucepan and bring it to a slow simmer over medium heat. If saving for later, simply store it in the refrigerator. Enjoy!

Tuesday, October 5, 2010

The Cookie Monster!

COOKIES! So I decided to make cookies the other day. I made 3 types: Oatmeal White Chocolate Chunk, Double Chocolate Chip, and Peanut Butter. After laboring in the kitchen for a ridiculous amount of time, I delivered the cookies to people in my apartment complex. They were a big hit! And according to my friend, I am now official "Cookie Monster."

Oatmeal White Chocolate Chunk Cookies 
  • 1 cup butter
  • 1 cup light brown sugar
  • 1 cup white sugar
  • 2 eggs
  • 2 teaspoons vanilla extract
  • 3 cups all-purpose flour
  • 1 teaspoon baking powder
  • 1 teaspoon baking soda
  • 1 teaspoon salt
  • 1/2 teaspoon cinnamon
  • 1 1/2 cups rolled oats
  • 2 cups white chocolate chips

Directions

  1. Preheat oven to 350 degrees F (175 degrees C). Lightly grease cookie sheets.
  2. In a medium bowl, cream together the butter, brown sugar and white sugar until smooth. Stir in the egg and vanilla. Sift together the flour, baking powder, baking soda and salt and cinnamon, stir into the creamed mixture. Finally, stir in the rolled oats, and white chocolate chips. REFRIGERATE DOUGH. Drop by tablespoons onto the prepared cookie sheets.
  3. Bake for 10 to 12 minutes in the preheated oven. Remove from baking sheets to cool on wire racks.

Double Chocolate Chip Cookies
  • 1 cup butter, softened
  • 1 1/2 cups white sugar
  • 2 eggs
  • 2 teaspoons vanilla extract
  • 2 cups all-purpose flour
  • 2/3 cup cocoa powder
  • 3/4 teaspoon baking soda
  • 1/4 teaspoon salt
  • 2 cups semisweet chocolate chips
  • 1/2 cup chopped walnuts (optional)

Directions

  1. Preheat oven to 350 degrees F (175 degrees C).
  2. In large bowl, beat butter, sugar, eggs, and vanilla until light and fluffy. Combine the flour, cocoa, baking soda, and salt; stir into the butter mixture until well blended. Mix in the chocolate chips and walnuts. REFRIGERATE DOUGH. Drop by rounded teaspoonfuls onto ungreased cookie sheets.
  3. Bake for 8 to 10 minutes in the preheated oven, or just until set. Cool slightly on the cookie sheets before transferring to wire racks to cool completely. 
Peanut Butter Cookies
  • 1 cup butter, softened
  • 1 cup white sugar
  • 1 cup packed brown sugar
  • 2 egg
  • 1 egg yolk
  • 2 teaspoons vanilla extract
  • 1 (18 ounce) jar peanut butter
  • 2 cups all-purpose flour
  • 1 teaspoon baking soda
  • 1/2 teaspoon salt
  • 1 cup chopped peanuts (optional)

Directions

  1. In a large bowl, cream butter, white sugar, and brown sugar until smooth. Add the eggs, yolks, and vanilla; mix until fluffy. Stir in peanut butter. Sift together the flour, baking soda, and salt; stir into the peanut butter mixture. Finally, stir in the peanuts. REFRIGERATE DOUGH. (Can I stress this enough? Haha.)
  2. Preheat oven to 350 degrees F (175 degrees C). Lightly grease a cookie sheet.
  3. Roll dough into walnut sized balls. Place on the prepared cookie sheet and flatten slightly with a fork. Bake for 12 to 15 minutes in the preheated oven. Cookies should look dry on top. Allow to cool for a few minutes on the cookie sheet before removing to cool completely on a rack. These cookies taste great when slightly undercooked.
 
Related Posts Plugin for WordPress, Blogger...